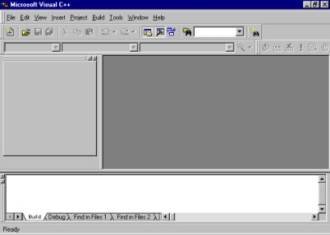
 Figure 1.1
Visual C++ Environment
Introduction to Microsoft Visual C++ 6.0
Microsoft Visual C++ 6.0 is a powerful tool that contains everything necessary to create anything from simple console DOS programs to sophisticated applications for 32-bit Windows® applications.
Open Visual C++ 6.0
1. Open Start Menu
2. Select Programs
3. Select Visual Studio 6.0
4. Select Visual C++ 6.0
Familiarize yourself with the Visual C++ environment
Note: If a Tip of the Day dialog box appears, read the tip and close the tip by clicking on the Close button in the top right corner of the dialog box. If you do not wish to view the Tip of the Day every time you open Visual C++, click the Show tips at Startup check box to remove the check mark and deselect this option.
Figure 1.1
Visual C++ Environment
Microsoft Visual C++ 6.0 provides an easy-to-use graphical user interface, referred to as a GUI. The Visual C++ contains a title bar and several toolbars. It also contains a Project Workspace window, an Output window, and a View window.
Visual C++ organizes programming tasks into projects with each program set up in its own project. A project is a collection of files that are all used to create one working program. Even a single-file program needs to be incorporated into a project before you can compile or execute it.
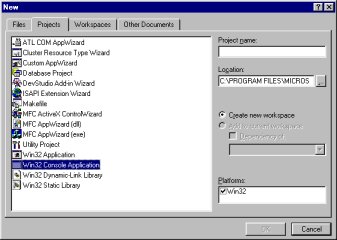 Figure 1.2
Start your first program by:
A dialogue box will appear asking what kind of project you want to create. All of the projects created in APCS will be Win32 Console Applications. Be sure not to select "Win32 Applications" as this will create major problems for you and you proceed with your program.
You must give your project a name at this point. Name your first project First. You will save your projects in your network directory. Type I: in the Location box and click OK.
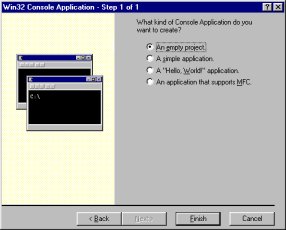
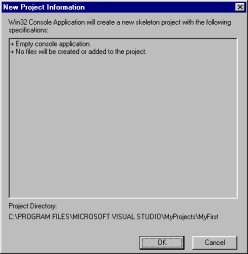
Figure 1.3 and Figure 1.4
You can simply click you way pass the next two screens. Choose An Empty Project from the Win32 Console Application dialogue box. Accept the New Project Information by clicking on OK.
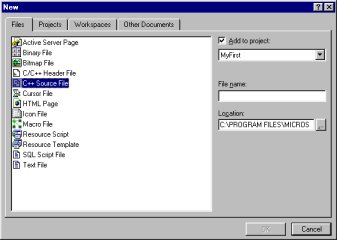 Figure 1.5
Once you have created your project it is time to start entering your source code for your program.
Steps:
This creates the file MyFirst.cpp (.cpp is C++ extension) will open up the Visual C++ Text Editor and you are ready to begin entering your code.
 Figure 1.6
There are three main windows you can now see in Visual C++.
The viewer window at the left has tabs named ClassView and FileView at the bottom. This window shows an overview of your project and is called the workspace. The ClassView tab shows the project organized by C++ classes. The FileView tab shows how the project is organized by files.
The Text Editor window on the right where you will enter and edit your source code (Note the name MyFirst.cpp at the top of the text editor). The text editor is very much like a word processor without the formatting features of the word processor. The file is saved with the extension .cpp.
The Results window at the bottom has tabs like Build, Debug, and Find in Files. This window shows the results of asking Visual C++ to compile your programs. The information found in this window will aide you debugging your programs.
MyFirst.cpp
// Your name
// MyFirst.cpp
// Today's date
#include <iostream.h>
void main(void) {
cout << "Hello Information Technology Class" << endl;
}
This tiny program was used to get us started with Visual C++ projects, workspaces, compiling programs, and the text editor.
Helpful Hints:
It is possible to have multiple copies of a source code open at the same time. Be careful not to do this or you will have problems insuring that the correct copy is edited and saved.
Also, building and executing a project creates a very large number of files that you will not need. Clean up your folders often, keeping just the files with the extension .cpp (program code), .h (header files), and .mdp and .mak (files that keep track of a project). Everything else can be recreated by again compiling, linking, and executing your program.